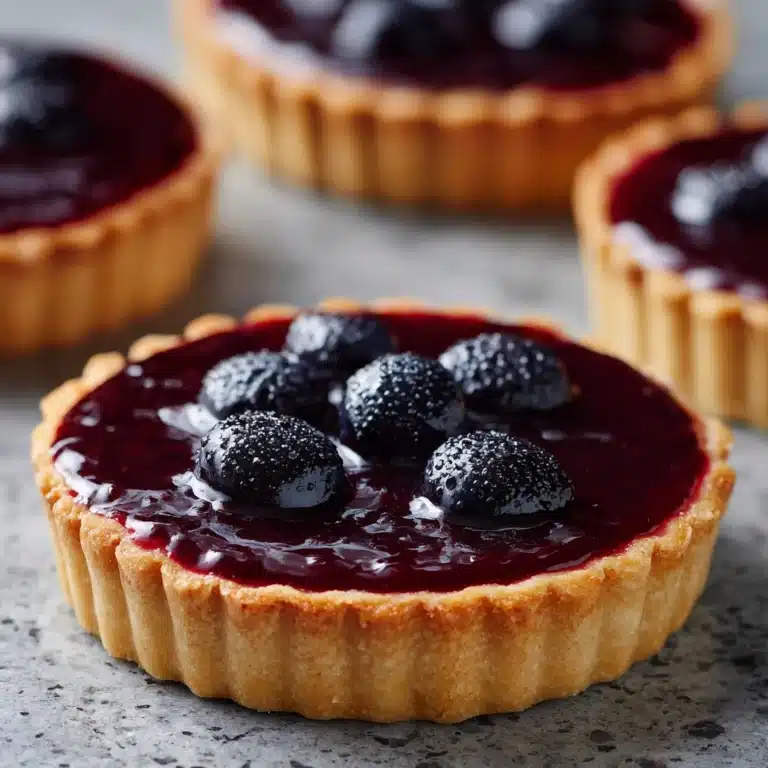
Vegan Cheesecake Tarts (Gluten-Free) Recipe
If you’re searching for a delightful dessert that’s both indulgent and wholesome, look no further than this Vegan Cheesecake Tarts (Gluten-Free) Recipe. These little tarts bring together a luscious, creamy cashew filling and a perfectly crumbly almond crust, creating a heavenly balance that’s entirely plant-based and free from gluten. Whether you’re vegan, gluten-intolerant, or just craving something fresh and naturally sweet, this recipe promises a rich, satisfying treat without any of the guilt. Let me walk you through why these tarts quickly became one of my favorite go-to desserts for any occasion.

Ingredients You’ll Need
Each ingredient in this recipe is carefully chosen for its role in crafting the perfect texture, flavor, and richness that define this dessert. Simple yet essential, these pantry staples come together harmoniously to bring out the best in your vegan cheesecake tarts.
- 1 cup almond flour: Provides a naturally nutty and gluten-free base that’s perfect for the tart crust.
- 1/4 cup coconut oil, melted: Adds moisture and helps bind the crust while imparting a subtle tropical aroma.
- 2 tablespoons maple syrup: Sweetens the crust with a delicate, natural maple flavor.
- 1/4 teaspoon salt: Balances sweetness and elevates the overall flavor.
- 1 cup cashews, soaked for 4 hours: The star of the creamy filling, soaked cashews blend into a rich, smooth base reminiscent of classic cheesecake.
- 1/2 cup coconut cream: Adds luxurious creaminess and a hint of coconut flavor.
- 1/4 cup maple syrup: Sweetens the filling naturally for a perfect dessert-level sweetness.
- 1 teaspoon vanilla extract: Brings warmth and depth to the flavor profile.
- 1/4 cup lemon juice: Adds brightness and a refreshing tang to cut through the richness.
- Fresh fruit for topping (optional): Berries, kiwi, or mango bring lovely color and fresh flavor that pairs with the creamy filling.
How to Make Vegan Cheesecake Tarts (Gluten-Free) Recipe
Step 1: Prepare the crust base
Start by preheating your oven to 350°F (175°C), which ensures that the crust bakes evenly and becomes delightfully crisp. In a mixing bowl, combine the almond flour, melted coconut oil, maple syrup, and salt. This simple blend will form a buttery, slightly sweet crust that holds together perfectly without gluten. Press this crumbly mixture firmly into the bottom of your tart pans—don’t be shy here; the firmer, the better for that satisfying bite.
Step 2: Bake the crust
Pop your prepared crusts into the preheated oven for about 10 minutes. This short bake time is enough to give the crust a slight golden finish while locking in its structure. Once baked, set them aside to cool completely—the crust needs to be cool before adding the luscious filling, or it might get soggy.
Step 3: Blend the cheesecake filling
While the crusts are cooling, it’s time to whip up that dreamy filling. In a high-speed blender, combine the soaked cashews, coconut cream, maple syrup, vanilla extract, and lemon juice. Blend all the ingredients until you have a thick, silky smooth mixture that tastes rich and slightly tangy. The soaking softens the cashews and makes the filling ultra creamy without a trace of graininess.
Step 4: Assemble and chill
Pour the velvety filling evenly into the cooled crusts. Smooth the tops with the back of a spoon or a small spatula, creating an inviting surface ready for any toppings you desire. Refrigerate your tarts for at least 2 hours to let them set properly. Patience here rewards you with a firm yet creamy texture that slices beautifully and melts in your mouth.
Step 5: Add fresh fruit topping and serve
Before serving, garnish your tarts with fresh fruit for that extra pop of color and flavor. This final touch not only looks stunning but also adds a refreshing contrast to the rich cheesecake filling, making every bite a delightful experience.
How to Serve Vegan Cheesecake Tarts (Gluten-Free) Recipe

Garnishes
Fresh fruit such as blueberries, raspberries, kiwi slices, or pomegranate seeds can make your tarts truly shine. A sprinkle of toasted coconut flakes or chopped nuts adds crunch and visual appeal, while a light dusting of cinnamon or cocoa powder provides warmth and aromatics that complement the tangy filling.
Side Dishes
Pair these tarts with a cup of freshly brewed herbal tea or a bold espresso for a harmonious balance of flavors. They also make a fantastic companion to a light fruit salad or a refreshing sorbet, perfect if you want to keep the dessert course vibrant and light.
Creative Ways to Present
Try serving the tarts on pretty dessert plates with edible flowers or drizzles of berry coulis for a gourmet touch. For a fun twist, you can also turn this Vegan Cheesecake Tarts (Gluten-Free) Recipe into mini bite-sized versions for parties or as elegant finger foods—perfect for sharing your delicious creation with friends and family.
Make Ahead and Storage
Storing Leftovers
Keep your leftover vegan cheesecake tarts covered tightly in the refrigerator. They stay fresh for up to 4 days, making them a perfect make-ahead dessert when you want something ready to impress without the fuss.
Freezing
You can freeze these tarts wrapped individually in plastic wrap and stored in an airtight container for up to 2 months. Thaw overnight in the fridge before serving to retain that silky texture and delicious flavor.
Reheating
Unlike many baked goods, these tarts are best enjoyed chilled, so avoid reheating. Instead, allow them to come to room temperature for about 10 minutes if you prefer them less firm, but keep their creamy, refreshing character intact by skipping the heat.
FAQs
Can I use other nuts instead of cashews?
Cashews are ideal for their creaminess when blended, but you can experiment with soaked macadamia nuts or blanched almonds. Keep in mind that the texture and flavor will vary slightly depending on the nut you choose.
Is this recipe suitable for people with nut allergies?
Unfortunately, this recipe relies heavily on nuts in both the crust and filling, so it is not recommended for those with nut allergies. You might want to seek out nut-free vegan cheesecake alternatives.
Can I make the crust without coconut oil?
Yes, substituting melted vegan butter or another neutral oil can work. Coconut oil is preferred for its binding properties and slight flavor, but these alternatives will still produce a tasty crust.
How long does the soaking of cashews need to be?
Soaking cashews for at least 4 hours softens them enough to blend into a smooth filling. If short on time, soaking in hot water for 1-2 hours can work, but the texture may be slightly less creamy.
Can I add chocolate or other flavors to this Vegan Cheesecake Tarts (Gluten-Free) Recipe?
Absolutely! Adding cocoa powder, melted vegan chocolate, or flavor extracts like almond or orange zest can personalize your tarts and keep them exciting. Just adjust the sweetness and liquids accordingly.
Final Thoughts
I truly hope you give this Vegan Cheesecake Tarts (Gluten-Free) Recipe a try, because it’s one of those rare desserts that feel both indulgent and nourishing all at once. Whether you’re vegan, gluten-free, or just a lover of beautifully simple desserts, these tarts are guaranteed to bring a smile to your face and warmth to your heart. Happy baking and even happier tasting!
Print
Vegan Cheesecake Tarts (Gluten-Free) Recipe
- Total Time: 2 hours 40 minutes
- Yield: 6 servings 1x
- Diet: Gluten Free
Description
These vegan gluten-free cheesecake tarts offer a creamy, dreamy dessert option made without dairy or gluten. With a crisp almond flour crust and luscious cashew-based filling, lightly sweetened with maple syrup and brightened with lemon juice, they are perfect for a guilt-free indulgence. Topped with fresh fruit, these tarts deliver a refreshing, naturally sweet finish.
Ingredients
Crust
- 1 cup almond flour
- 1/4 cup coconut oil, melted
- 2 tablespoons maple syrup
- 1/4 teaspoon salt
Filling
- 1 cup cashews, soaked for 4 hours
- 1/2 cup coconut cream
- 1/4 cup maple syrup
- 1 teaspoon vanilla extract
- 1/4 cup lemon juice
Topping (optional)
- Fresh fruit for topping
Instructions
- Preheat oven: Preheat your oven to 350°F (175°C) to prepare for baking the crust.
- Make crust mixture: In a mixing bowl, combine almond flour, melted coconut oil, maple syrup, and salt thoroughly until the mixture holds together.
- Form crust: Press the crust mixture firmly and evenly into the bottoms of your tart pans to create a base.
- Bake crust: Bake the pressed crusts in the preheated oven for 10 minutes, then set aside to cool completely.
- Prepare filling: In a blender, combine the soaked cashews, coconut cream, maple syrup, vanilla extract, and lemon juice for the filling.
- Blend filling: Blend all filling ingredients on high until smooth and creamy, ensuring no lumps remain for a perfect texture.
- Fill tart shells: Pour the creamy cheesecake filling into the cooled tart crusts, spreading evenly.
- Chill tarts: Refrigerate the filled tarts for at least 2 hours to allow the filling to firm up and set properly.
- Add topping: Just before serving, top each tart with fresh fruit to enhance flavor and presentation.
Notes
- Soak cashews for a minimum of 4 hours or overnight for the creamiest filling.
- Ensure the crust is cool before adding the filling to avoid melting.
- You can use any seasonal fresh fruit as a topping, such as berries, kiwi, or mango.
- Maple syrup can be adjusted for sweetness preference.
- These tarts keep well refrigerated for up to 3 days.
- Prep Time: 30 minutes
- Cook Time: 10 minutes
- Category: Dessert
- Method: Baking
- Cuisine: Vegan


