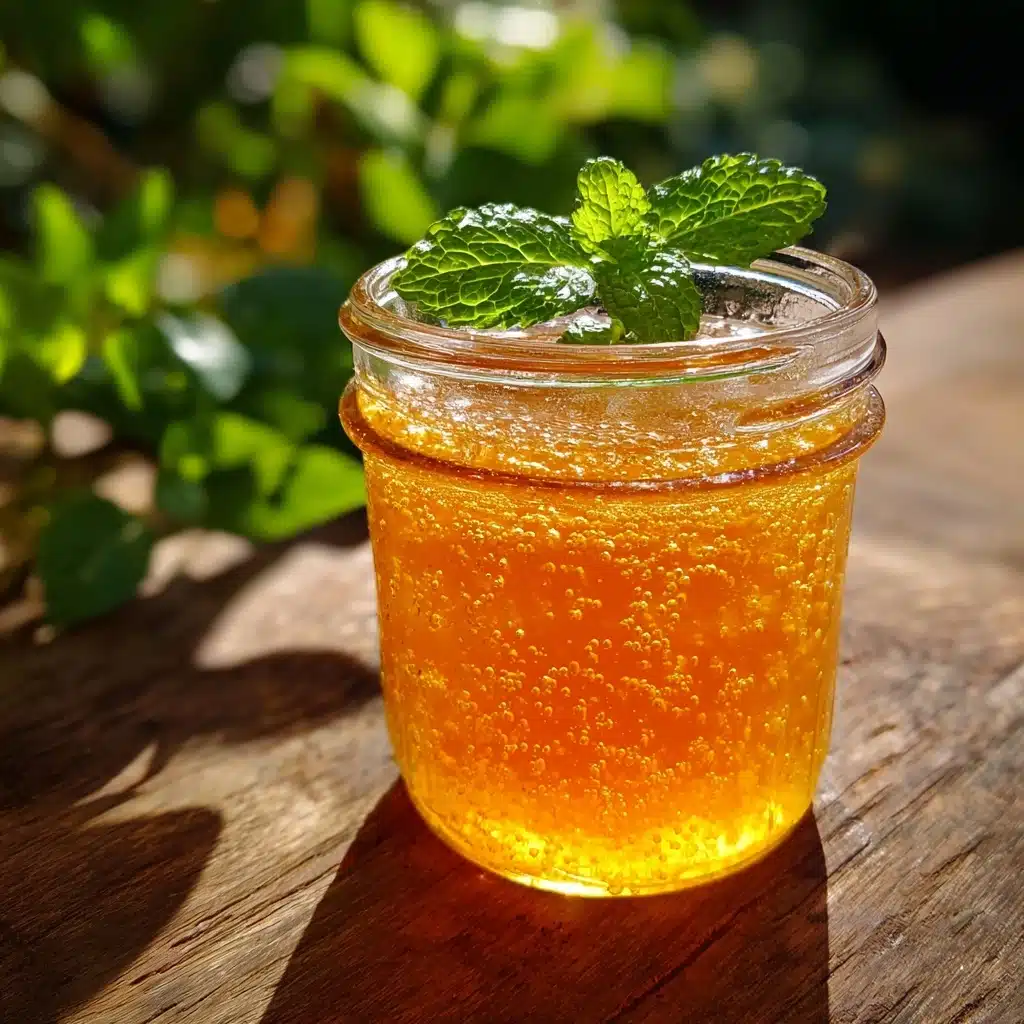
Dreamsicle Jelly Recipe
If you’ve ever wanted to bottle up the sweet nostalgia of an orange creamsicle, then Dreamsicle Jelly is the treat you need in your life! Imagine a luscious, spreadable jelly bursting with vibrant citrus and a creamy vanilla finish, transforming breakfast, dessert, or snack time into an adventure for your taste buds. This fun twist on classic jelly captures all the dreamy flavors of your childhood favorite popsicle and turns them into something you’ll want to swirl into yogurt, dollop on warm biscuits, or spoon right out of the jar. Let’s make magic together—homemade Dreamsicle Jelly is as delightful to eat as it is to share!
Ingredients You’ll Need
-
For the Jelly:
- 2 cups orange juice (preferably fresh-squeezed or no-pulp)
- 1/4 cup lemon juice
- 1/2 cup heavy cream
- 1 tablespoon vanilla extract
- 1 box (1.75 oz) fruit pectin (such as Sure-Jell)
- 4 cups granulated sugar
- 1/4 teaspoon butter (to reduce foaming)
How to Make Dreamsicle Jelly
Step 1: Combine the Creamy Citrus Base
Start by grabbing a large, deep saucepan—this jelly bubbles up as it cooks! Pour in the orange juice, lemon juice, heavy cream, and vanilla extract. Whisk everything together until it looks smooth, creamy, and already smells irresistible. This initial blend is where the magic of that classic dreamsicle flavor starts!
Step 2: Dissolve the Pectin
Sprinkle the fruit pectin into your creamy citrus mixture and whisk well to dissolve. Mixing it in before heat ensures there won’t be any lumps, and it’s the trick to getting that perfect, spreadable jelly texture that Dreamsicle Jelly is famous for.
Step 3: Bring to a Rolling Boil
Set your saucepan over medium-high heat. Stirring constantly, bring the mixture to a full rolling boil—that means the bubbles keep popping even while you’re stirring. Take a second to breathe in that amazing aroma swirling around your kitchen!
Step 4: Add Sugar and Butter
Dump in all the granulated sugar at once and keep stirring until it’s completely dissolved and the mixture’s glossy and thick. Add the butter now; it’ll help prevent a foamy top so your Dreamsicle Jelly looks professionally clear and inviting.
Step 5: Boil for One Intense Minute
Turn up the excitement! Bring the mixture back to a rolling boil and continue stirring. Once you have that robust bubbling, set a timer and boil for exactly one minute—no more, no less. This ensures your jelly sets beautifully and keeps the flavors vibrant. Remove from the heat when done.
Step 6: Fill the Jars
Quickly and carefully ladle the hot Dreamsicle Jelly into sterilized jars, leaving about 1/4-inch headspace at the top. Wipe the rims clean, then screw on the lids and rings just until they’re fingertip tight. This is where your kitchen starts looking—and smelling—like a cozy, vintage candy shop!
Step 7: Process and Cool
Process the jars in a boiling water bath for 10 minutes to ensure safe sealing (and a delightful “pop” as they cool). Set the jars on a towel to cool completely. Once they’re cool, check the seals and prepare yourself to fall in love with homemade Dreamsicle Jelly!
How to Serve Dreamsicle Jelly

Garnishes
This jelly practically begs for playful garnishes. Try a curl of orange zest on top of your toast, a sprinkle of chopped pistachios for crunch, or even a dollop of lightly whipped cream to echo the “dreamsicle” vibe. Presentation really brings out the special occasion feel!
Side Dishes
Dreamsicle Jelly shines next to classics like warm biscuits, English muffins, or croissants. For brunch, set out a platter of scones and fresh fruit with a dish of this jelly at the center. You can even swirl it into plain yogurt, layer it with granola, or serve with pancakes and waffles for a breakfast that’s as fun as it is delicious.
Creative Ways to Present
This jelly goes beyond breakfast—think cheese boards, thumbprint cookies, or as a filling for cupcakes and cakes. A tiny jar of Dreamsicle Jelly makes a heartfelt homemade gift, or serve it in small glass bowls at a dinner party for an elegant, surprising dessert course.
Make Ahead and Storage
Storing Leftovers
Properly sealed jars of Dreamsicle Jelly can be stored in a cool, dark pantry for up to a year. Once opened, keep the jar in the refrigerator, tightly closed, and use within about one month for best flavor. Always use a clean spoon to avoid introducing moisture or bacteria.
Freezing
If you end up with extra, you can absolutely freeze Dreamsicle Jelly! Spoon cooled jelly into freezer-safe containers, leaving some space for expansion, and freeze for up to six months. Thaw overnight in the refrigerator for a taste of summer any time.
Reheating
If your jelly sets a bit too firmly when chilled, gently warm the jar in a bowl of hot water or microwave a small spoonful for a few seconds until it’s spreadable again. The creamy texture will return, perfect for easy drizzling or spreading.
FAQs
Can I use bottled orange juice for Dreamsicle Jelly?
Fresh-squeezed orange juice gives the brightest flavor, but high-quality no-pulp bottled orange juice works just fine. Just avoid juices with extra sugar or additives so your jelly tastes pure and vibrant.
Why do I need heavy cream in this recipe?
The cream is what turns ordinary jelly into true Dreamsicle Jelly! It lends velvety texture and that elusive creamy taste reminiscent of the classic orange creamsicle treat.
What does the butter do in Dreamsicle Jelly?
Butter acts as a foam reducer during boiling, helping your finished jelly stay clear and pretty when jarred. It’s a classic canning trick for a picture-perfect batch every time.
How long will homemade Dreamsicle Jelly last?
If you process and seal the jars properly, your jelly should last in a pantry for up to a year. Once opened, store in the fridge and enjoy within a month for freshest flavor.
Can I make Dreamsicle Jelly with less sugar?
Yes! Try using a low-sugar pectin and follow the instructions on the package to reduce sugar. Be aware this may alter the set, but you’ll still have fabulously creamy and citrusy jelly.
Final Thoughts
If you’re dreaming of something bright, creamy, and truly unforgettable, give this Dreamsicle Jelly a try. It’s easy, impressive, and made for sharing—the kind of recipe that sparks smiles with every spoonful. Break out your jars and let’s make dessert magic happen!
Print
Dreamsicle Jelly Recipe
- Total Time: 30 minutes
- Yield: 6 half-pint jars 1x
- Diet: Vegetarian
Description
Indulge in the nostalgic flavors of a dreamsicle with this delightful Dreamsicle Jelly recipe. Bursting with citrusy orange and creamy vanilla notes, this homemade jelly is perfect for spreading on toast or swirling into yogurt.
Ingredients
For the Jelly:
- 2 cups orange juice (preferably fresh-squeezed or no-pulp)
- 1/4 cup lemon juice
- 1/2 cup heavy cream
- 1 tablespoon vanilla extract
- 1 box (1.75 oz) fruit pectin (such as Sure-Jell)
- 4 cups granulated sugar
- 1/4 teaspoon butter (to reduce foaming)
Instructions
- Prepare the Jelly: In a large saucepan, combine orange juice, lemon juice, heavy cream, and vanilla extract. Dissolve fruit pectin, bring to a boil, and add sugar. Boil for 1 minute, skimming foam.
- Canning: Ladle hot jelly into sterilized jars, process in a boiling water bath for 10 minutes, and cool before storing.
Notes
- This jelly tastes like a classic orange creamsicle and is delicious on toast, biscuits, or swirled into yogurt.
- For a firmer set, reduce the cream slightly or use a low-sugar pectin with adjusted sugar levels.
- Prep Time: 15 minutes
- Cook Time: 15 minutes
- Category: Condiment
- Method: Canning
- Cuisine: American
Nutrition
- Serving Size: 1 tablespoon
- Calories: 50
- Sugar: 12g
- Sodium: 0mg
- Fat: 0.5g
- Saturated Fat: 0.3g
- Unsaturated Fat: 0.2g
- Trans Fat: 0g
- Carbohydrates: 13g
- Fiber: 0g
- Protein: 0g
- Cholesterol: 2mg


