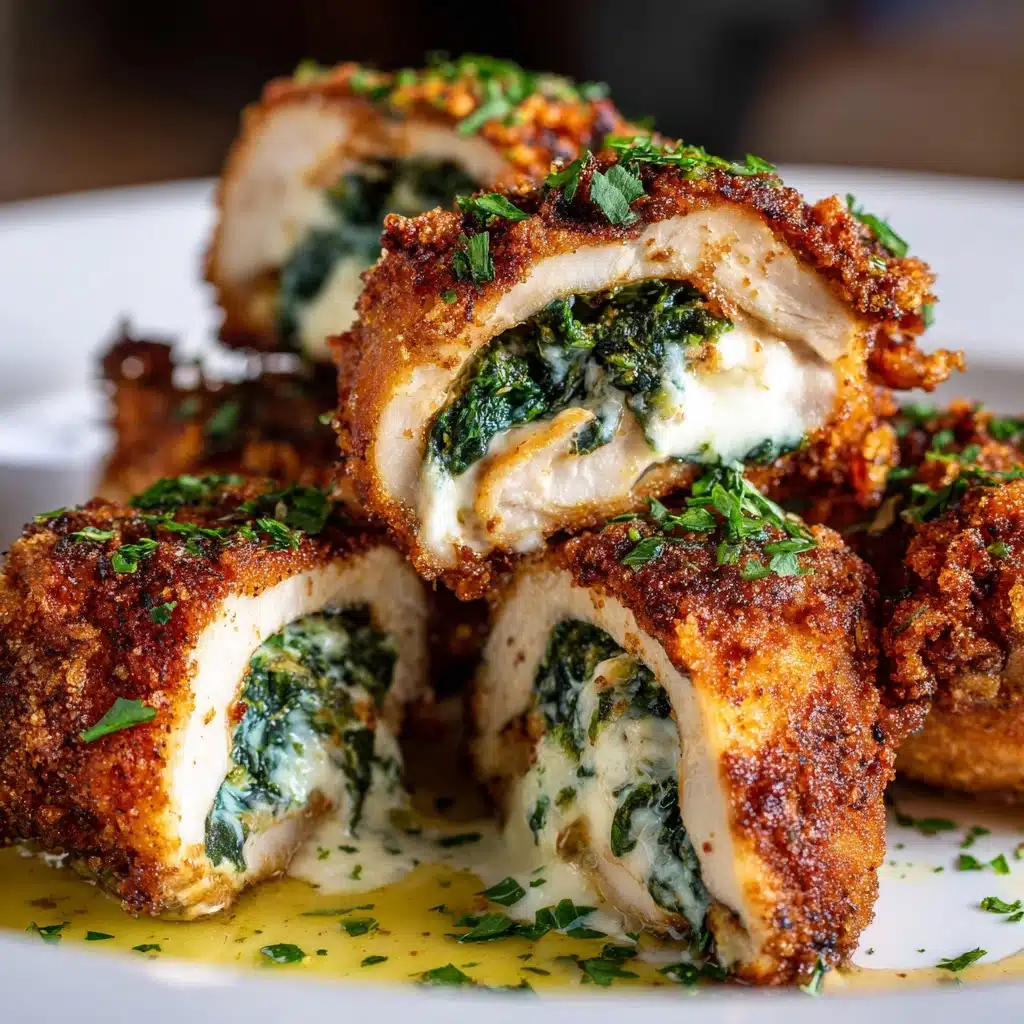
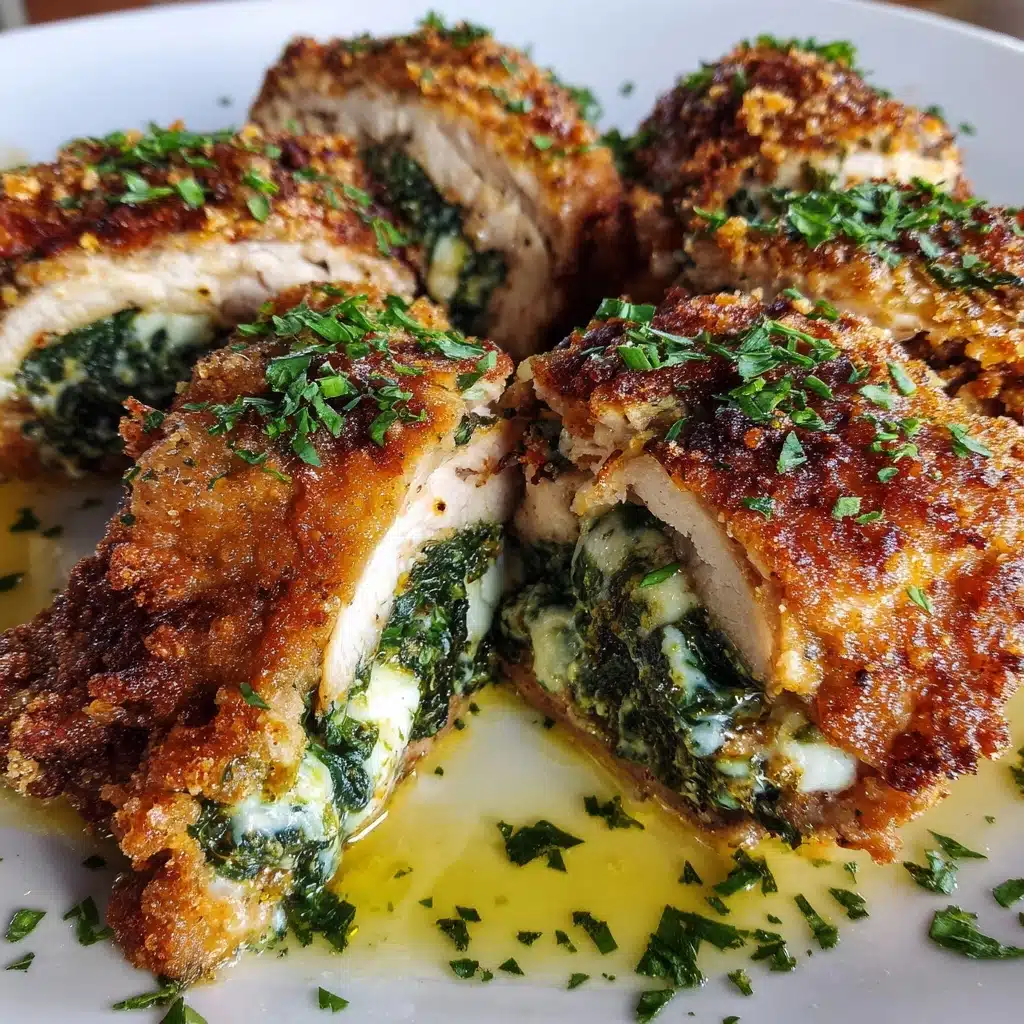
Chicken Kiev with Garlic Butter Recipe
If you’re looking for a show-stopping dinner that’s both comforting and elegant, Chicken Kiev with Garlic Butter is just the ticket. This classic dish features juicy chicken breasts wrapped around a core of fragrant, melty garlic butter, then coated in a crispy, golden crust. When you cut into it, the rich butter spills out—an irresistible surprise that never fails to impress. Whether you’re making it for a special occasion or just want to elevate your weeknight dinner, Chicken Kiev with Garlic Butter delivers big flavors with minimal fuss.
Ingredients You’ll Need
The beauty of Chicken Kiev with Garlic Butter is how a handful of everyday ingredients come together to create something truly spectacular. Each one plays an important role, whether it’s adding flavor, crunch, or that signature buttery burst.
- Chicken Breasts: Go for boneless, skinless breasts—they’re easy to pound thin and perfect for wrapping around that delicious butter.
- Unsalted Butter: The heart of the dish! Use good-quality butter for that rich, creamy center.
- Garlic: Minced fresh garlic infuses the butter with bold, aromatic flavor.
- Fresh Parsley: Chopped parsley adds color and a fresh, herbal note to the filling.
- Lemon Juice: Just a splash brightens the butter and balances the richness.
- Salt and Black Pepper: Essential for seasoning both the butter and the chicken.
- All-Purpose Flour: Helps the coating stick and gives the exterior a nice base layer.
- Eggs: Beaten eggs act as the “glue” for the breadcrumbs.
- Breadcrumbs (preferably panko): Panko breadcrumbs make for an extra-crispy crust, but regular ones work too!
- Paprika: Adds a touch of warmth and beautiful color to the coating.
- Vegetable Oil: Used for frying, it ensures a crisp, golden exterior.
How to Make Chicken Kiev with Garlic Butter
Step 1: Make the Garlic Butter
Start by mixing your softened butter with minced garlic, fresh parsley, lemon juice, salt, and pepper in a small bowl. The goal is a smooth, fragrant compound butter. Scoop this mixture onto a piece of plastic wrap, form it into a log, and wrap tightly. Pop it in the freezer for about 30 minutes, or until it’s firm. This makes it easy to handle and keeps it from oozing out during assembly.
Step 2: Flatten the Chicken
Lay each chicken breast between two sheets of plastic wrap. Using a meat mallet or rolling pin, gently pound each one out to about 1/4-inch thickness. This not only helps with even cooking but also makes it possible to roll the chicken snugly around the butter. Try to keep the thickness consistent for best results.
Step 3: Fill and Roll the Chicken
Unwrap your chilled garlic butter and cut it into four equal pieces. Place each piece in the center of a flattened chicken breast. Fold in the sides, then roll up the chicken tightly, making sure the butter is sealed in. Secure the rolls with toothpicks if needed—this helps ensure none of that precious garlic butter escapes while cooking.
Step 4: Bread the Chicken
Get three shallow bowls ready: one with flour, one with beaten eggs, and one with panko breadcrumbs mixed with paprika. Dredge each chicken roll in flour, then dip it in egg, and finally coat it in the breadcrumb mixture. For an extra-crunchy exterior, you can dip it back in the egg and breadcrumbs a second time. This double-dipping trick gives Chicken Kiev with Garlic Butter its signature crisp shell.
Step 5: Chill Before Cooking
Once all your chicken rolls are coated, place them in the refrigerator for 20 to 30 minutes. This short chill time helps the breading adhere and the chicken hold its shape, especially during frying. It’s a small step that makes a big difference in the final presentation.
Step 6: Fry and Bake
Heat 1 to 2 inches of vegetable oil in a deep skillet over medium-high heat. When it shimmers, carefully add the chicken rolls and fry for 3 to 4 minutes per side, turning so they’re golden and crispy all over. Transfer the browned rolls to a baking sheet and bake in a preheated 375°F (190°C) oven for 15 to 20 minutes, or until the chicken is cooked through and an instant-read thermometer registers 165°F (74°C). Let the Chicken Kiev with Garlic Butter rest for about 5 minutes before serving to keep all that melted butter inside.
How to Serve Chicken Kiev with Garlic Butter
Garnishes
A simple sprinkle of chopped fresh parsley over the top adds a pop of color and hints at the herby goodness inside. For a little extra flair, add a wedge of lemon on the side—its brightness pairs beautifully with the rich garlic butter.
Side Dishes
Chicken Kiev with Garlic Butter is fantastic alongside creamy mashed potatoes, steamed rice, or a crisp green salad. The buttery sauce that flows out is perfect for spooning over veggies or sopping up with a hunk of crusty bread.
Creative Ways to Present
If you want to wow your guests, slice each Chicken Kiev into thick rounds right before serving so everyone can see the luscious garlic butter center. Arrange them on a platter with a scattering of parsley and a few lemon slices for a restaurant-worthy look.
Make Ahead and Storage
Storing Leftovers
If you have any leftovers, let the Chicken Kiev with Garlic Butter cool to room temperature, then transfer to an airtight container. Store in the refrigerator for up to three days. The breading may soften slightly, but the flavors will still be delicious.
Freezing
You can freeze uncooked, breaded Chicken Kiev with Garlic Butter for up to two months. Place the prepared rolls on a parchment-lined baking sheet and freeze until solid, then wrap individually and store in a freezer-safe bag. Cook straight from frozen, adding a few extra minutes to the baking time.
Reheating
To reheat, place the leftover Chicken Kiev on a baking sheet and warm in a 350°F (175°C) oven until heated through, about 15 minutes. This helps restore the crispy crust much better than microwaving, which can make the coating soggy.
FAQs
Can I use chicken thighs instead of breasts?
Chicken thighs can be used, but they’re a bit trickier to pound thin and roll. For the classic texture and look of Chicken Kiev with Garlic Butter, boneless breasts are best.
What’s the best way to seal the chicken so the butter doesn’t leak out?
Be sure to fold in the sides of the chicken before rolling tightly, and secure with toothpicks. Chilling the rolled chicken before breading and cooking also helps keep the butter safely inside.
Can I make Chicken Kiev with Garlic Butter ahead of time?
Absolutely! You can assemble and bread the chicken up to a day in advance, then store in the fridge until ready to fry and bake. You can even freeze the prepared, uncooked rolls for later.
Is it possible to bake instead of fry for a lighter version?
Yes, you can bake the Chicken Kiev with Garlic Butter at 400°F for about 25 to 30 minutes. It won’t be quite as crispy, but it’s a great alternative if you want to skip frying.
What kind of breadcrumbs work best?
Panko breadcrumbs are ideal for that extra-crunchy crust, but regular breadcrumbs will work in a pinch. Seasoned varieties can add even more flavor to your Chicken Kiev with Garlic Butter.
Final Thoughts
If you’ve never tried making Chicken Kiev with Garlic Butter at home, now’s the time! It’s a satisfying project with a totally delicious payoff. Gather your ingredients, follow these simple steps, and get ready for a meal that’s melt-in-your-mouth good and sure to earn rave reviews from everyone at the table.
Print
Chicken Kiev with Garlic Butter Recipe
- Total Time: 1 hour
- Yield: 4 servings 1x
- Diet: Non-Vegetarian
Description
Chicken Kiev with Garlic Butter is a classic Eastern European dish featuring succulent chicken breasts stuffed with flavorful garlic parsley butter. Coated in a crisp breadcrumb crust and cooked by frying and baking, this recipe delivers a juicy, buttery center with a perfectly crunchy exterior ideal for a comforting main course.
Ingredients
For the Garlic Butter:
- 1/2 cup unsalted butter (softened)
- 3 cloves garlic (minced)
- 2 tablespoons fresh parsley (chopped)
- 1 teaspoon lemon juice
- 1/2 teaspoon salt
- 1/4 teaspoon black pepper
For the Chicken:
- 4 boneless, skinless chicken breasts
- 1/2 cup all-purpose flour
- 2 large eggs (beaten)
- 1 cup breadcrumbs (preferably panko)
- 1/2 teaspoon paprika
- Vegetable oil for frying
Instructions
- Prepare the Garlic Butter: In a small bowl, combine softened butter with minced garlic, chopped parsley, lemon juice, salt, and black pepper. Mix until evenly blended. Transfer the mixture onto plastic wrap and shape into a log. Wrap tightly and freeze for about 30 minutes until firm.
- Flatten the Chicken Breasts: Place each chicken breast between two pieces of plastic wrap and pound gently using a meat mallet or rolling pin until about 1/4-inch thick. This ensures even cooking and easier rolling.
- Assemble the Chicken Kiev: Remove the garlic butter log from the freezer and cut into 4 equal pieces. Place one butter piece in the center of each flattened chicken breast. Fold the sides over the butter and roll tightly to encase it completely. Secure with toothpicks if necessary to prevent butter leakage.
- Coat the Chicken: Set up three shallow bowls: one with flour, one with beaten eggs, and one with breadcrumbs mixed with paprika. Dredge each chicken roll in flour, shake off excess, dip into the egg, then press thoroughly into the breadcrumb mixture. For an extra crunchy crust, dip the chicken again in egg and breadcrumbs for a double coating.
- Chill the Coated Chicken: Refrigerate the coated chicken rolls for 20–30 minutes to help them maintain their shape and keep the butter sealed inside during cooking.
- Fry the Chicken: Heat 1 to 2 inches of vegetable oil in a deep skillet over medium-high heat. Fry the chicken rolls for 3–4 minutes per side, turning carefully until golden brown and crisp. This initial frying seals the coating.
- Bake to Finish: Transfer the fried chicken rolls onto a baking sheet. Bake in a preheated oven at 375°F (190°C) for 15–20 minutes, or until the chicken is cooked through and internal temperature reaches 165°F (74°C).
- Rest and Serve: Let the chicken rest for 5 minutes before serving to allow the juices and melted butter to settle. Remove toothpicks before plating.
Notes
- For a lighter, less oily option, bake the chicken Kiev entirely at 400°F for 25–30 minutes instead of frying, but note this results in a less crispy crust.
- Serve with mashed potatoes, steamed rice, or a fresh green salad for a complete meal.
- Ensure the chicken is tightly sealed around the garlic butter to prevent leakage during cooking.
- Use panko breadcrumbs for a crispier coating.
- Allow the butter log to firm up well in the freezer to make shaping easier.
- Prep Time: 30 minutes
- Cook Time: 30 minutes
- Category: Main Course
- Method: Frying and Baking
- Cuisine: Eastern European
Nutrition
- Serving Size: 1 stuffed chicken breast
- Calories: 520
- Sugar: 1g
- Sodium: 450mg
- Fat: 32g
- Saturated Fat: 15g
- Unsaturated Fat: 14g
- Trans Fat: 0.5g
- Carbohydrates: 20g
- Fiber: 1g
- Protein: 42g
- Cholesterol: 160mg


