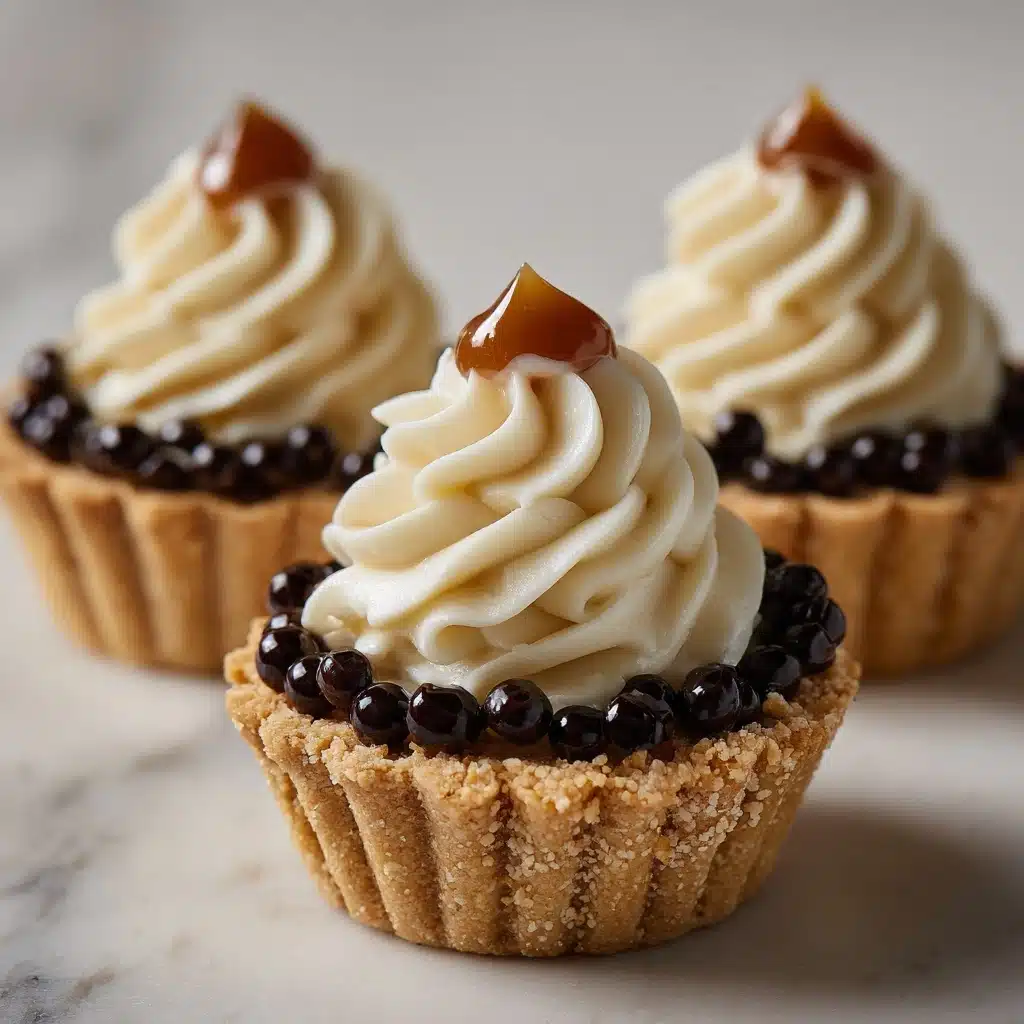
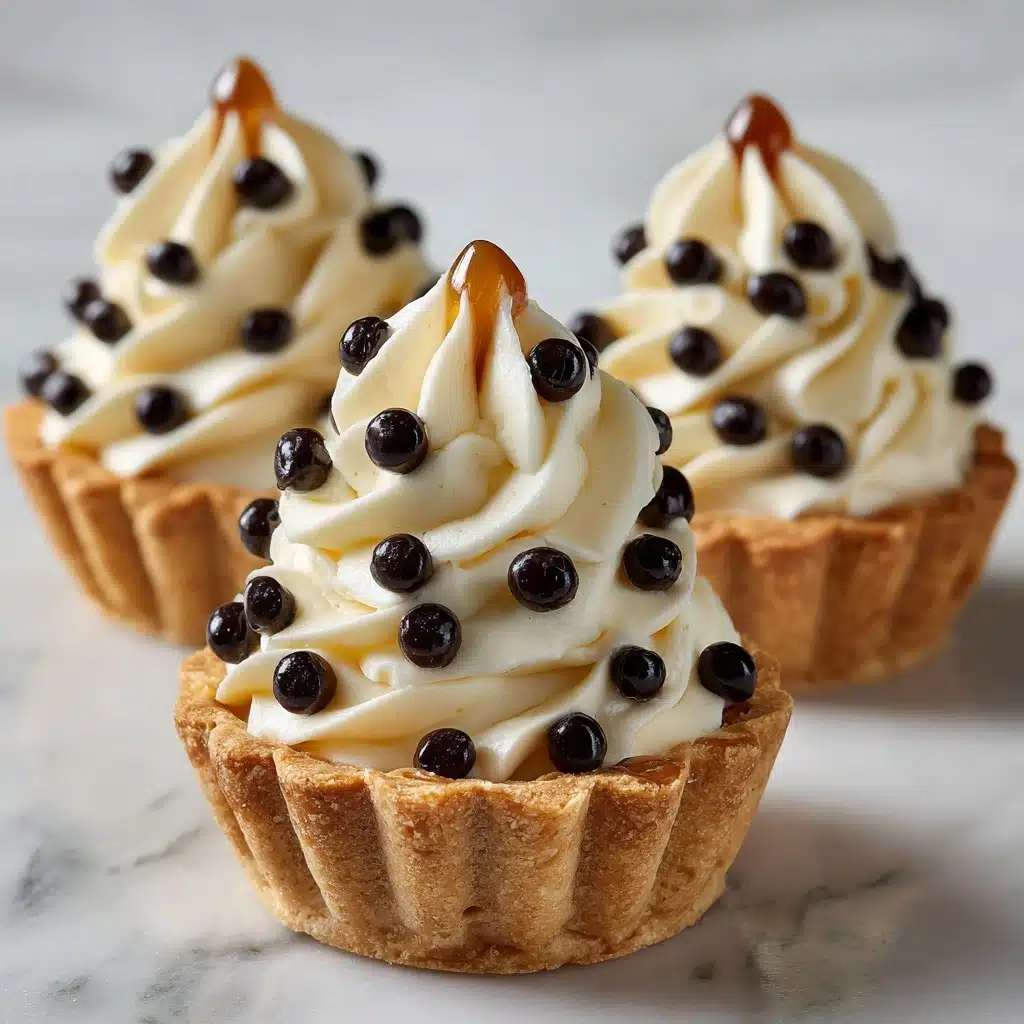
Mini Cannoli Cups Recipe
If you’re searching for a show-stopping, bite-sized treat that captures the essence of classic Italian cannoli with a fraction of the effort, you’ll absolutely love these Mini Cannoli Cups. Buttery, crisp pie crust cups hold a dreamy, lightly sweet ricotta-mascarpone filling studded with chocolate chips. They taste like a cannoli but come together in your own kitchen—no frying required! Perfect for parties, potlucks, or just because your sweet tooth demands something special.
Ingredients You’ll Need
The magic of Mini Cannoli Cups is how a handful of familiar ingredients come together to create something truly irresistible. Each element adds its own touch—creaminess, sweetness, crunch, or a burst of chocolate—that makes these cups shine.
- Refrigerated Pie Crusts: These save time and deliver that flaky, tender base that echoes traditional cannoli shells.
- Whole Milk Ricotta Cheese (drained): Provides the classic, creamy body for the filling—drain well for the best texture.
- Mascarpone Cheese: Adds extra richness and a subtle tang that takes the filling from “good” to “can’t-stop-eating.”
- Powdered Sugar: Sweetens gently and blends seamlessly into the smooth filling for that signature cannoli sweetness.
- Vanilla Extract: Enhances every flavor note with warm, aromatic undertones—don’t skip it!
- Ground Cinnamon: Just a touch gives a whisper of warmth and classic Italian flavor.
- Mini Chocolate Chips: Folded into the filling and used on top, they bring in that wonderful chocolatey bite.
- Powdered Sugar (for dusting): A snowy finish that’s as pretty as it is tasty.
- Optional: Chopped Pistachios or Extra Chocolate Chips: Colorful, crunchy, and totally celebratory for garnishing.
How to Make Mini Cannoli Cups
Step 1: Prep and Shape the Crust
Preheat your oven to 400°F (200°C) and lightly grease a mini muffin tin. Roll out your pie crusts on a lightly floured surface, then use a 2.5 to 3-inch round cutter to stamp out circles. Gently press each circle into the wells of the muffin tin, shaping them into little cups. Don’t forget to lightly prick the bottoms with a fork—this clever step keeps your cups from puffing up and losing their shape while baking.
Step 2: Bake the Cups
Slide your prepared tin into the oven and bake for 10 to 12 minutes, until the edges turn a tempting golden brown and the scent of buttery pastry fills the kitchen. Let them cool completely right in the pan before carefully popping them out. This helps them keep their adorable shape for perfect Mini Cannoli Cups.
Step 3: Mix the Cannoli Filling
While the crusts cool, whip up your filling. In a medium bowl, mix together the drained ricotta (really press out that excess liquid for the creamiest result), mascarpone, powdered sugar, vanilla extract, and ground cinnamon. Beat everything until it’s velvety smooth, then fold in the mini chocolate chips. Cover the bowl and let the filling chill for at least 30 minutes—this extra step makes it firmer and easier to pipe or spoon into the shells.
Step 4: Fill and Finish
Once the cups and filling are ready, it’s assembly time! Either spoon the creamy filling into each cup or pipe it in for a picture-perfect look. Top with extra chocolate chips, a sprinkle of chopped pistachios, or a generous dusting of powdered sugar. Mini Cannoli Cups always look extra inviting with those pretty finishing touches.
How to Serve Mini Cannoli Cups
Garnishes
Presentation is half the fun! Dust your Mini Cannoli Cups with a light veil of powdered sugar for that authentic bakery vibe. Sprinkle on some extra mini chocolate chips or add a few chopped pistachios for a pop of color and crunch. You can even add delicate curls of orange zest for a citrusy twist that pairs perfectly with the creamy filling.
Side Dishes
These mini treats are perfectly at home on a dessert tray alongside fresh berries or a fruit salad, balancing their sweetness with a bright, juicy bite. Serve them with a pot of strong espresso or a cappuccino for an Italian-inspired finale to any meal. For a party platter, pile them high with chocolate-dipped strawberries, biscotti, or tiny scoops of gelato.
Creative Ways to Present
Your Mini Cannoli Cups deserve a festive reveal! Try arranging them on a tiered dessert stand for an elegant afternoon tea. Tuck each cup into a mini cupcake wrapper for easy pick-up at parties, or nestle them in a beautiful box and deliver to friends as a homemade gift. For special occasions, sprinkle the platter with edible gold flakes or candied orange—all about those little “wow” moments!
Make Ahead and Storage
Storing Leftovers
If you find yourself with leftovers (it’s a rare occasion!), store filled Mini Cannoli Cups in an airtight container in the refrigerator. Enjoy within 1–2 days for the best texture, as the crust may soften over time from the creamy filling.
Freezing
For ultimate freshness, freeze the filled cups only if you must, keeping in mind the crust may lose some crispness. A better option is to freeze the empty baked shells separately for up to a month and keep the filling refrigerated. Thaw the cups at room temperature, then fill and garnish just before serving.
Reheating
Mini Cannoli Cups don’t require reheating, but if you want to refresh the shells, you can quickly crisp empty pastry cups in a warm oven (300°F for a few minutes) before filling. Never microwave them, as this can make the crusts chewy and the filling runny.
FAQs
Can I make Mini Cannoli Cups ahead of time?
Absolutely! You can bake the pastry cups and prepare the filling up to a day in advance. Store them separately, and fill the cups just before serving to keep everything perfectly crisp and fresh.
Is it necessary to drain the ricotta?
Yes, draining the ricotta is crucial for achieving that thick, luscious filling. If you skip this step, your filling may turn out loose and make the pastry soggy, so take the extra minute to press out the moisture.
Can I use homemade pie crust?
Definitely—you can swap refrigerated dough for your favorite homemade pie crust recipe if you like! The final result will be even flakier and more personal, though store-bought still delivers deliciously consistent results.
What other toppings can I try?
Besides chocolate chips and pistachios, try candied orange peel, chopped dried cherries, or a pinch of sea salt. These add fun new textures and flavor twists to your Mini Cannoli Cups.
Are these Mini Cannoli Cups suitable for kids?
Kids (and kids at heart) love them! They’re perfectly sized for little hands and not too sweet. You can even get the family involved in decorating the tops for even more fun.
Final Thoughts
I can’t recommend trying Mini Cannoli Cups enough—they’re joyful to make, even more delightful to eat, and always a crowd-pleaser. Share them at your next gathering and get ready for plenty of “Can I have another?” moments. Happy baking, and enjoy every creamy, crispy bite!
Print
Mini Cannoli Cups Recipe
- Total Time: 32 minutes
- Yield: 24 mini cups
- Diet: Vegetarian
Description
These mini cannoli cups are a delightful bite-sized dessert featuring a creamy ricotta and mascarpone filling with hints of vanilla and cinnamon, all nestled in a flaky pie crust cup. Topped with mini chocolate chips and a dusting of powdered sugar, these treats are perfect for parties or a sweet indulgence.
Ingredients
Pie Crust Cups:
1 package (15 oz) refrigerated pie crusts (2 crusts)
Cannoli Filling:
1 cup whole milk ricotta cheese, drained; 1/2 cup mascarpone cheese; 1/2 cup powdered sugar; 1/2 teaspoon vanilla extract; 1/4 teaspoon ground cinnamon; 1/3 cup mini chocolate chips; powdered sugar, for dusting; optional: chopped pistachios or extra chocolate chips for garnish
Instructions
- Preheat and Prepare: Preheat oven to 400°F (200°C). Grease a mini muffin tin. Roll out pie crusts, cut circles, and press into muffin tin. Bake until golden brown.
- Make Filling: Combine ricotta, mascarpone, sugar, vanilla, and cinnamon. Fold in chocolate chips. Chill.
- Fill Cups: Spoon or pipe filling into cooled crust cups. Garnish and serve.
Notes
- Ensure ricotta is well-drained for a thick filling.
- Prepare cups and filling ahead, but fill just before serving for best texture.
- Prep Time: 20 minutes
- Cook Time: 12 minutes
- Category: Dessert
- Method: Baking
- Cuisine: Italian-American
Nutrition
- Serving Size: 1 mini cup
- Calories: 110
- Sugar: 6g
- Sodium: 80mg
- Fat: 6g
- Saturated Fat: 3g
- Unsaturated Fat: 2g
- Trans Fat: 0g
- Carbohydrates: 11g
- Fiber: 0g
- Protein: 2g
- Cholesterol: 10mg


